Kubernetes 101 - First 3 Components to Learn (part 2)
Overview
As you saw in Part 1, pods are not accessible outside the cluster on their own. Running the kubectl proxy command is an easy way to test in development. But when you go to production, a better option is required. That’s where the Service component helps.
Pod Connectivity
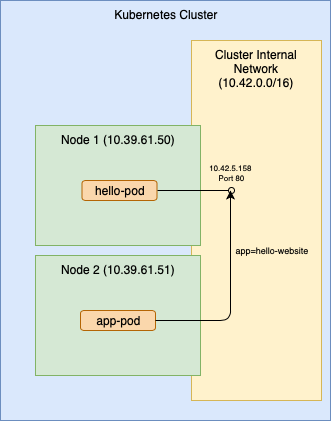
Pods are assigned dynamic IP addresses in the clusters internal network. Even though this provides a direct (no NAT or proxy) connection, it’s not ideal for many use cases. The endpoint is only reachable by apps that are also on the internal network. Also, internal client apps still need to find the address first since it’s dyanmically assigned. Finding the pod IP is often done by querying Kubernetes with a label selector. A selector can identify one or more pods where traffic should be sent. Selectors are quite powerful, but a simple example is to use a label that has a unique value such as app=hello-website in the examples below.

Here’s the pod object spec example from Part 1, updated with a label named ‘app’ and exposing port 80 in the web service container.
apiVersion: v1
kind: Pod
metadata:
  name: hello-pod
  labels:
    app: hello-website
spec:
  containers:
    - name: hello-container
      image: docker.io/busybox:latest
      command: ["/bin/sh"]
      args: ["-c", "while true; do echo 'Hello'; sleep 3; done"]
    - name: web-service
      image: docker.io/nginx:latest
      ports:
        - containerPort: 80
In the example above, app-pod is responsible for first querying Kubernetes using the selector to find the pod IP for hello-pod, then it can use the IP to connect.
Service Type ClusterIP
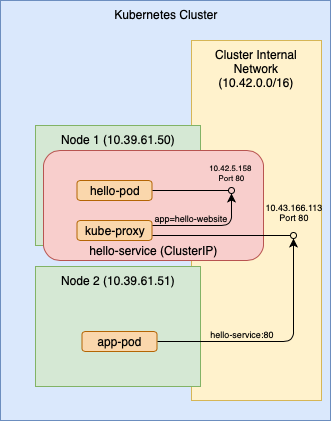
A Service provides a way to expose a pod endpoint to other applications at a well known location, avoiding the selector query step. Services can also be made accessible outside the cluster. You can think of a service as a set of mapping rules. On one side it defines the endpoint used to accept incoming connections and on the other side it defines the destination pod that handles the connections. Kubernetes is responsible for exposing the service endpoints and delivering the traffic to your pod according to the its object spec.
On the front end of the mapping, a service can expose an endpoint in several ways. The Type key in its object spec defines the method used. ClusterIP is the default value. With ClusterIP, the service is available at an internal IP address. It also registers a static name for itself in the Kubernetes internal DNS for name resolution. That makes calling it from another app much easier. Also, the service can define a different port from the one used by the pod. For example, we may want the exposed service to listen on port 80 but the pod internally listens to port 8080.
On the back end, the service again uses a label selector to find the destination pod similar to the app-pod example above. However, Kubernetes does the query automatically for a service based on its selector value set in its object spec.

Here’s an example object spec for a service of type ClusterIP and a selector that finds our hello-pod pod. Remember, the selector refers to the label, not the pod name.
kind: Service
apiVersion: v1
metadata:
  name: hello-service
spec:
  type: ClusterIP
  selector:
    app: hello-website
  ports:
  - protocol: TCP
    port: 80
In this example, app-pod can connect to hello-pod directly using the service name hello-service since it is resolvable by the Kubernetes DNS.
Service Type NodePort
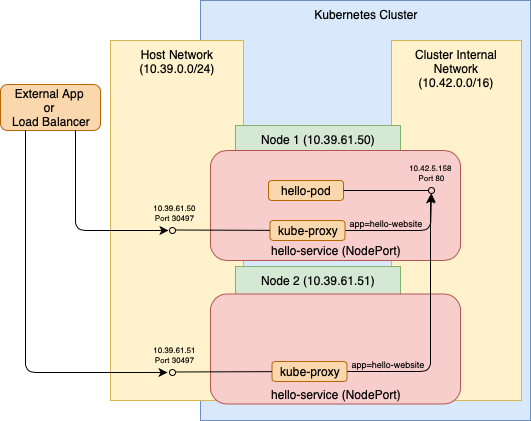
If we change the service type to NodePort, Kubernetes makes the service endpoint accessible outside the cluster. It does this using its internal component kube-proxy which runs on every node. Through kube-proxy, every node in the cluster listens to the service port on its external IP and proxies the connection to the service destination pod.
By default Kubernetes will assign a random port in a configured range, but you can also specify a port to use. Just remember that each port number can only be used once across all services, since they are sharing the same external IP address.
As shown in the diagram below, the service can then be called by an external app from outside the cluster using that port at any of the node IP addresses. The external app could also be an external load balancer that uses several of the node IP’s for redundancy.

Here’s a service object spec to expose an endpoint as NodePort listening on a randomly assigned port. On the back end, it maps to port 80 on the pod having label app=hello-website. Save the YAML as a file named ‘hello-svc.yaml’.
kind: Service
apiVersion: v1
metadata:
  name: hello-service
spec:
  type: NodePort
  selector:
    app: hello-website
  ports:
  - protocol: TCP
    port: 80
Assuming the pod is already running from Part 1 (or go back and restart it), we now apply the service object spec file.
> kubectl apply -f hello-svc.yaml
service/hello-service created
You can see the assigned port, NodePort: <unset> 30497/TCP , and other useful information using the describe command.
> kubectl describe svc hello-service
Name:                     hello-service
Namespace:                default
Labels:                   <none>
Annotations:              field.cattle.io/publicEndpoints:
                            [{"addresses":["10.39.61.41"],"port":30497,"protocol":"TCP","serviceName":"default:hello-service","allNodes":true}]
                          kubectl.kubernetes.io/last-applied-configuration:
                            {"apiVersion":"v1","kind":"Service","metadata":{"annotations":{},"name":"hello-service","namespace":"default"},"spec":{"ports":[{"port":80...
Selector:                 app=hello-website
Type:                     NodePort
IP:                       10.43.205.143
Port:                     <unset>  80/TCP
TargetPort:               80/TCP
NodePort:                 <unset>  30497/TCP
Endpoints:                10.42.5.158:80
Session Affinity:         None
External Traffic Policy:  Cluster
Events:                   <none>
And finally to confirm the service works, you can do a web request to the port on any one of the node IP addresses using your favorite browser or utility.
> curl http://10.39.61.51:30497
<!DOCTYPE html>
<html>
<head>
<title>Welcome to nginx!</title>
<style>
    body {
        width: 35em;
        margin: 0 auto;
        font-family: Tahoma, Verdana, Arial, sans-serif;
    }
</style>
</head>
<body>
<h1>Welcome to nginx!</h1>
<p>If you see this page, the nginx web server is successfully installed and
working. Further configuration is required.</p>

<p>For online documentation and support please refer to
<a href="http://nginx.org/">nginx.org</a>.<br/>
Commercial support is available at
<a href="http://nginx.com/">nginx.com</a>.</p>

<p><em>Thank you for using nginx.</em></p>
</body>
</html>
>
When the web request is sent, Kubernetes handles it internally according to the service object spec. Remember, the service is a mapping from an endpoint to a target pod.
There are also other Type values, such as LoadBalancer, that may be available depending on your cloud provider and network architecture. Diving into more complex network architectures may be a good topic for a future post.
Conclusion
The Kubernetes Service component plays a crucial role, since most applications need to have an endpoint accessible outside the cluster. In this post, you saw the beginnings of how to use them. It’s simple to get started and when you want more complex configurations, it’s usually possible.